前言 写这篇文章的初衷源自对 Spring 框架中事件机制的好奇心。在编写观察者模式代码示例时,我突然想起了 Spring 框架中支持多事件监听的特性,例如ContextClosedEvent、ContextRefreshedEvent、ContextStartedEvent等等。传统的观察者模式通常是基于单一事件的,但 Spring 框架却提供了一种更为灵活的机制,可以处理多个不同类型的事件。
因此,我决定深入研究 Spring 框架中多事件监听的实现机制,并将我的学习总结记录下来。通过这篇文章,我希望能够帮助读者更好地理解 Spring 框架中事件机制的工作原理,以及如何利用这一机制来构建灵活、高效的应用程序。我相信这对于对 Spring 框架感兴趣的开发者来说会是一次有益的学习经历。
一、Spring 事件简介 1、Spring Context 模块内嵌的事件
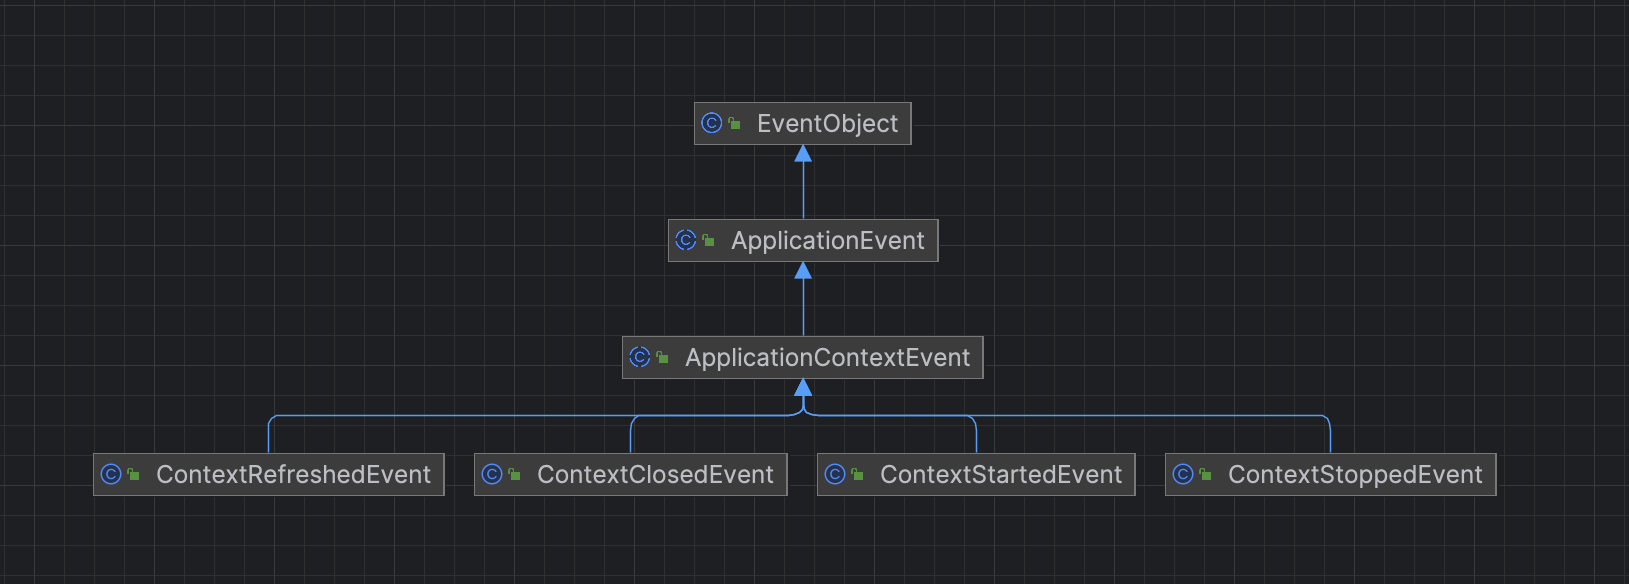
实际上我们,继承 ApplicationEvent 的事件对象很多,他们分布在 Spring 生态的各个模块(spring framework、spring mvc、springboot)中,这里就不一一赘述了,就简单介绍下 spring-context 模块下实现的几个事件,如上图所示,spring-context 模块下内嵌了四种事件容器刷新、容器开启、容器关闭、容器停止。
通过 UML 图可以看到,他们有一个共同的父类就是 EventObject,为什么 Spring 没有自立门户而是选择了继承 EventObject 呢?我猜测作者可能有以下的考虑:
遵循标准:Java 标准库提供了 EventObject 类作为事件的基类,这是一种广泛接受和认可的设计模式。Spring 框架遵循这一标准,可以使开发者能够更加容易地理解和使用 Spring 事件机制,而不需要学习新的事件模型。
与 Java 生态的整合:继承自标准库的 EventObject 类使得 Spring 框架的事件机制能够更好地与 Java 生态中其他库和框架整合。这种一致性有助于开发者在不同的项目中使用相似的编程模型,提高了代码的可维护性和可复用性。
减少重复工作:避免造轮子。
2、 Spring 事件监听与广播 我们先来看下关于事件监听和广播相关组件的 UML 图:
可能大家感觉这个图比较绕。是的,乍一看是有点绕,但是我们进行下归类就可以变得清晰,我们分为以下三类:
2.1、事件存储器 在事件存储器方面,我们有两个关键类:
ListenerRetriever(监听器检索器) :用于事件的存储和检索。该类包含一个 Set<ApplicationEvent<?>> 属性,用于存储注册的事件监听器。ListenerCacheKey(监听器缓存键) :此类用于事件缓存,以提高在广播过程中查找与特定事件相关联的监听器的速度。通过使用缓存,可以有效地提升广播性能。
2.2、事件监听器 事件监听器由 ApplicationListener 类扮演:
ApplicationListener(应用程序监听器) :它继承自 EventListener 接口,并且通过泛型上限限制了监听的事件类型为 ApplicationEvent 或其子类。这个类的实现用于处理特定类型的事件,可以在应用程序中注册多个监听器来响应不同类型的事件。
2.3、事件广播器 最后,让我们关注事件广播器,有两个主要组件:
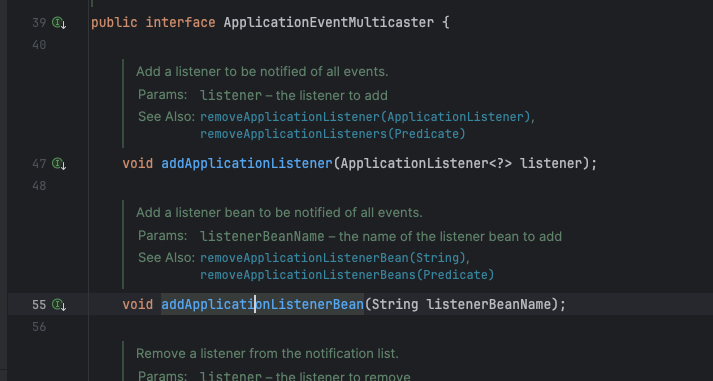
ApplicationEventPublisher(应用事件发布器) :定义了事件发布的行为。它允许应用程序通过调用 publishEvent() 方法来发布特定的事件,然后将该事件传递给已注册的监听器。SimpleApplicationEventMulticaster(简单应用事件多播器) :此组件实现了多事件监听器的广播。它负责管理事件监听器的注册和通知,并根据特定的事件类型将事件分发给相应的监听器。通过使用多播器,应用程序可以有效地处理并响应各种事件。
二、Spring 事件应用 阅读完上面的内容后,相信大家对 Spring 事件机制有了一定的了解,接下来就趁热打铁,动手实现一个事件监听示例来彻底掌握 Spring 事件的应用。
针对 Spring 应用程序刷新完成(refresh) 进行监听,打印 Spring 应用中所有的 Bean 示例。
自定义一个监听器实现 ApplicationListener
1
2
3
4
5
6
7
8
9
10
11
12
13
14
15
16
17
18
19
20
21
22
23
24
25
26
package com.markus.spring.event.listener;import org.springframework.beans.factory.config.AutowireCapableBeanFactory;import org.springframework.beans.factory.support.DefaultListableBeanFactory;import org.springframework.context.ApplicationContext;import org.springframework.context.ApplicationListener;import org.springframework.context.event.ContextRefreshedEvent;public class ContextRefreshedEventListener implements ApplicationListener <ContextRefreshedEvent> { @Override public void onApplicationEvent (ContextRefreshedEvent event) { ApplicationContext context = (ApplicationContext) event.getSource(); String[] beanDefinitionNames = context.getBeanDefinitionNames(); System.out.println("=============== 开始打印 Bean Name ===============" ); for (String beanDefinitionName : beanDefinitionNames) { System.out.println(beanDefinitionName); } System.out.println("=============== 结束打印 Bean Name ===============" ); } }
创建 ApplicationContext,并将 ContextRefreshedEventListener 注册进容器中,接着刷新应用上下文,监听到 ContextRefreshedEvent 事件打印 Bean 名称列表
1
2
3
4
5
6
7
8
9
10
11
12
13
14
15
16
17
18
19
20
21
22
package com.markus.spring.event;import com.markus.spring.event.listener.ContextRefreshedEventListener;import org.springframework.context.annotation.AnnotationConfigApplicationContext;import org.springframework.context.annotation.Configuration;@Configuration public class ApplicationEventListenerDemo { public static void main (String[] args) { AnnotationConfigApplicationContext context = new AnnotationConfigApplicationContext (); context.register(ApplicationEventListenerDemo.class); context.addApplicationListener(new ContextRefreshedEventListener ()); context.refresh(); context.close(); } }
三、Spring 事件广播原理 本文多次提到 Spring 事件监听机制实现的是多事件,那是如何的多事件的,接下来我们就深入 Spring 框架内部去一探究竟!
1、事件监听器的来源 这里我们先入为主,声明一下事件监听器的来源,通常我们会通过如下两种方式去向 Spring 容器中注册监听器:
将监听器注册为 Spring Bean
通过 API 添加至 Spring 容器中
2、事件发布 2.1、事件监听器召回 1 2 3 4 5 6 7 8 9 10 11 12 13 14 15 16 17 18 19 20 21 22 23 24 25 26 27 28 29 30 31 32 33 34 35 36 37 38 39 40 41 42 43 44 45 46 47 48 49 50 51 52 53 54 55 56 57 58 59 60 61 62 63 64 65 66 67 68 69 70 71 72 73 74 75 76 77 78 79 80 81 82 83 84 85 86 87 88 89 90 91 92 93 94 95 96 97 98 99 100 101 102 103 104 105 106 107 108 109 110 111 112 113 114 115 protected Collection<ApplicationListener<?>> getApplicationListeners( ApplicationEvent event, ResolvableType eventType) { Object source = event.getSource(); Class<?> sourceType = (source != null ? source.getClass() : null ); ListenerCacheKey cacheKey = new ListenerCacheKey (eventType, sourceType); CachedListenerRetriever newRetriever = null ; CachedListenerRetriever existingRetriever = this .retrieverCache.get(cacheKey); if (existingRetriever == null ) { if (this .beanClassLoader == null || (ClassUtils.isCacheSafe(event.getClass(), this .beanClassLoader) && (sourceType == null || ClassUtils.isCacheSafe(sourceType, this .beanClassLoader)))) { newRetriever = new CachedListenerRetriever (); existingRetriever = this .retrieverCache.putIfAbsent(cacheKey, newRetriever); if (existingRetriever != null ) { newRetriever = null ; } } } if (existingRetriever != null ) { Collection<ApplicationListener<?>> result = existingRetriever.getApplicationListeners(); if (result != null ) { return result; } } return retrieveApplicationListeners(eventType, sourceType, newRetriever); } private Collection<ApplicationListener<?>> retrieveApplicationListeners( ResolvableType eventType, @Nullable Class<?> sourceType, @Nullable CachedListenerRetriever retriever) { List<ApplicationListener<?>> allListeners = new ArrayList <>(); Set<ApplicationListener<?>> filteredListeners = (retriever != null ? new LinkedHashSet <>() : null ); Set<String> filteredListenerBeans = (retriever != null ? new LinkedHashSet <>() : null ); Set<ApplicationListener<?>> listeners; Set<String> listenerBeans; synchronized (this .defaultRetriever) { listeners = new LinkedHashSet <>(this .defaultRetriever.applicationListeners); listenerBeans = new LinkedHashSet <>(this .defaultRetriever.applicationListenerBeans); } for (ApplicationListener<?> listener : listeners) { if (supportsEvent(listener, eventType, sourceType)) { if (retriever != null ) { filteredListeners.add(listener); } allListeners.add(listener); } } if (!listenerBeans.isEmpty()) { ConfigurableBeanFactory beanFactory = getBeanFactory(); for (String listenerBeanName : listenerBeans) { try { if (supportsEvent(beanFactory, listenerBeanName, eventType)) { ApplicationListener<?> listener = beanFactory.getBean(listenerBeanName, ApplicationListener.class); if (!allListeners.contains(listener) && supportsEvent(listener, eventType, sourceType)) { if (retriever != null ) { if (beanFactory.isSingleton(listenerBeanName)) { filteredListeners.add(listener); } else { filteredListenerBeans.add(listenerBeanName); } } allListeners.add(listener); } } else { Object listener = beanFactory.getSingleton(listenerBeanName); if (retriever != null ) { filteredListeners.remove(listener); } allListeners.remove(listener); } } catch (NoSuchBeanDefinitionException ex) { } } } AnnotationAwareOrderComparator.sort(allListeners); if (retriever != null ) { if (filteredListenerBeans.isEmpty()) { retriever.applicationListeners = new LinkedHashSet <>(allListeners); retriever.applicationListenerBeans = filteredListenerBeans; } else { retriever.applicationListeners = filteredListeners; retriever.applicationListenerBeans = filteredListenerBeans; } } return allListeners; }
2.2、实现多事件监听的关键代码 概括一下这段代码就是:匹配出支持当前事件的监听器。具体实现就是将事件监听器的泛型类型参数和当前时间的类型进行比对,如果能匹配就说明当前监听器是监听当前的事件。
1
2
3
4
5
6
7
8
9
10
11
12
13
14
15
16
17
18
19
20
21
22
23
24
25
26
27
28
private boolean supportsEvent ( ConfigurableBeanFactory beanFactory, String listenerBeanName, ResolvableType eventType) { Class<?> listenerType = beanFactory.getType(listenerBeanName); if (listenerType == null || GenericApplicationListener.class.isAssignableFrom(listenerType) || SmartApplicationListener.class.isAssignableFrom(listenerType)) { return true ; } if (!supportsEvent(listenerType, eventType)) { return false ; } try { BeanDefinition bd = beanFactory.getMergedBeanDefinition(listenerBeanName); ResolvableType genericEventType = bd.getResolvableType().as(ApplicationListener.class).getGeneric(); return (genericEventType == ResolvableType.NONE || genericEventType.isAssignableFrom(eventType)); } catch (NoSuchBeanDefinitionException ex) { return true ; } } protected boolean supportsEvent (ApplicationListener<?> listener, Class<? extends ApplicationEvent> eventType, Class<?> sourceType) { SmartApplicationListener smartListener = (listener instanceof SmartApplicationListener ? (SmartApplicationListener) listener : new GenericApplicationListenerAdapter (listener)); return (smartListener.supportsEventType(eventType) && smartListener.supportsSourceType(sourceType)); }
四、本文总结 好了,小结一下。
通过本文的详细介绍,我们对 Spring 框架中的事件广播机制有了更深入的了解。我们首先探讨了 Spring 框架中的事件模型,了解了在 Spring 生态中各个模块内嵌的事件,以及它们共同继承的父类 EventObject。我们也分析了为什么 Spring 选择继承 EventObject 而不是自行实现一套事件机制,这是因为遵循标准、与 Java 生态的整合以及减少重复工作等考虑。
接着,我们深入研究了 Spring 框架中事件监听和广播相关的组件。我们将这些组件分为事件存储器、事件监听器和事件广播器三个类别,并对每个类别下的关键类进行了详细的介绍。通过这种方式,我们更清晰地理解了 Spring 框架中事件的存储、监听和广播的机制。
最后,我们通过一个实际的示例演示了如何使用 Spring 框架中的事件机制。我们编写了一个简单的示例程序,演示了如何监听 Spring 应用程序刷新完成事件,并在事件发生时打印出所有 Bean 的名称列表。通过这个示例,我们加深了对 Spring 事件机制的理解,并展示了如何在实际项目中应用这一机制。
综上所述,本文对 Spring 框架中事件广播机制进行了全面而深入的探讨,希望能够帮助读者更好地理解和应用 Spring 框架中强大的事件机制。


 微信
微信 支付宝
支付宝