引言

在软件开发中,经常会遇到不同接口之间的兼容性问题。当需要使用一个已有的类,但其接口与我们所需的不兼容时,我们可以通过适配器模式来解决这一问题。适配器模式是一种结构型设计模式,它允许接口不兼容的类之间进行合作。本文将深入探讨适配器模式的概念、应用场景以及在Java中的实现方式。

一、理解适配器模式

1.1 什么是适配器模式?

适配器模式是一种结构型设计模式,旨在将一个类的接口转换为另一个类的接口,以使原本不兼容的类能够一起工作。适配器模式通常涉及一个适配器类,该类充当两个不兼容接口之间的桥梁,使得它们可以相互协作。

1.2 适配器模式的角色

在适配器模式中,通常有以下几个角色:

  • 目标接口(Target):定义客户端使用的特定领域接口。
  • 适配器(Adapter):实现目标接口,并包装一个或多个不兼容的类,以使其与客户端一起工作。
  • 被适配者(Adaptee):拥有需要被适配的接口,但与目标接口不兼容。

二、适配器模式的应用场景

2.1 与现有代码的集成

当我们需要在现有代码基础上添加新的功能或组件时,通常会遇到新旧代码之间接口不兼容的情况。此时,适配器模式可以帮助我们将新组件与现有代码进行无缝集成,而无需修改已有的代码。

2.2 复用现有功能

有时我们可能会有一些功能强大但接口不兼容的类库,而我们希望利用这些功能来实现自己的需求。适配器模式可以将这些现有类库包装在一个适配器中,以便我们可以轻松地在自己的项目中复用这些功能。

三、Java 中的适配器模式实现

在Java中,适配器模式常见的实现方式包括类适配器和对象适配器两种。

3.1 类适配器

类适配器通过继承被适配者类并实现目标接口来实现适配器。下面是一个简单的示例:

1
2
3
4
5
6
7
8
9
10
11
12
13
14
15
16
17
18
19
// 目标接口
interface Target {
void request();
}

// 被适配者
class Adaptee {
void specificRequest() {
System.out.println("Adaptee's specific request");
}
}

// 类适配器
class Adapter extends Adaptee implements Target {
@Override
public void request() {
specificRequest();
}
}

3.2 对象适配器

对象适配器通过将被适配者对象作为适配器的一个成员变量来实现适配器。下面是一个简单的示例:

1
2
3
4
5
6
7
8
9
10
11
12
13
// 对象适配器
class Adapter implements Target {
private Adaptee adaptee;

Adapter(Adaptee adaptee) {
this.adaptee = adaptee;
}

@Override
public void request() {
adaptee.specificRequest();
}
}

3.3 基于对象适配器实现一个真实的案例

拿我身边的事物举例:我有一个 mac 笔记本电脑,现在我想拓展一个显示器,但是我买的显示器提供的接口仅支持 HDMI 接口,而我的电脑上并不支持这个接口,怎么办呢?这时候拓展坞就出现了,它将显示器和笔记本电脑连接在了一起,实现了显示器拓展屏的功能。场景如下图所示:

image-20240405103436732

这就是一个典型的适配器模式场景,我们来看下职责划分:

  • type-c 接口就是目标接口
  • 拓展坞 就是适配器
  • HDMI 接口就是被适配器

总体就是 HDMI 接口通过拓展坞适配成了 type-c 接口插入电脑使用。我们来看下代码实现:

  • 拓展坞及其支持的插槽
1
2
3
4
5
6
7
8
9
10
11
12
13
14
15
16
17
18
19
20
21
22
23
24
25
26
27
28
29
30
31
32
33
34
35
36
37
38
39
40
41
42
43
44
45
46
47
48
49
50
51
52
53
54
55
56
57
58
59
60
61
62
63
64
65
66
67
68
69
70
71
72
73
74
75
76
package com.markus.desgin.mode.structural.adapter;

import static com.markus.desgin.mode.structural.adapter.ComputerSlot.HDMI;
import static com.markus.desgin.mode.structural.adapter.ComputerSlot.USB;

public class ComputerAdapter implements AdvancedComputerSlot {

ComputerSlot usb = new USBSlot();
ComputerSlot hdmi = new HDMISlot();

public ComputerAdapter() {

}

@Override
public void typeC(String type) {

switch (type) {
case HDMI:
hdmi.hdmi();
break;
case USB:
usb.usb();
break;
default:
throw new UnsupportedOperationException("拓展坞中没有该类型的数据插槽!");
}
}
}

public interface ComputerSlot {

String HDMI = "HDMI";
String USB = "USB";

void hdmi();

void usb();

String type();
}

public class HDMISlot implements ComputerSlot {
@Override
public void hdmi() {
System.out.println("数据线插入 HDMI 接口成功!");
}

@Override
public void usb() {
throw new UnsupportedOperationException("该数据线不允许插入当前插槽");
}

@Override
public String type() {
return HDMI;
}
}

public class USBSlot implements ComputerSlot {
@Override
public void hdmi() {
throw new UnsupportedOperationException("该数据线不允许插入当前插槽");
}

@Override
public void usb() {
System.out.println("数据线插入 USB 接口成功!");
}

@Override
public String type() {
return USB;
}
}

  • 目标接口
1
2
3
4
5
6
7
8
9
10
11
12
13
14
15
16
17
18
19
20
21
22
23
24
25
26
public interface AdvancedComputerSlot {

String TYPEC = "TYPE-C";

void typeC(String type);
}

public class AdvancedComputerSlotImpl implements AdvancedComputerSlot {

ComputerAdapter adapter = new ComputerAdapter();

@Override
public void typeC(String type) {
switch (type) {
case ComputerSlot.HDMI:
case ComputerSlot.USB:
adapter.typeC(type);
break;
case TYPEC:
System.out.println("Type-C 接口插入成功!");
break;
default:
throw new UnsupportedOperationException("暂时不支持插入其他类型");
}
}
}
  • 客户端
1
2
3
4
5
6
7
8
public class AdapterPatternDemo {
public static void main(String[] args) {
AdvancedComputerSlot advancedComputerSlot = new AdvancedComputerSlotImpl();
advancedComputerSlot.typeC(TYPEC);
advancedComputerSlot.typeC(HDMI);
advancedComputerSlot.typeC(USB);
}
}

四、适配器模式在 Spring 框架中的使用

4.1 org.springframework.web.servlet.HandlerAdapter

在 Spring MVC 中,HandlerAdapter 负责将请求分发给相应的处理器(Handler)。不同类型的处理器可能具有不同的接口,而 HandlerAdapter 则负责将不同类型的处理器适配为统一的处理器接口,从而实现请求的统一处理。

我们来看下 HandlerAdapter 的接口设计以及部分实现类:

1
2
3
4
5
6
7
8
9
10
11
12
13
14
15
16
17
18
19
20
21
22
23
24
25
26
27
28
29
30
31
32
33
34
35
36
37
38
39
40
41
42
43
public interface HandlerAdapter {

/**
* Given a handler instance, return whether this {@code HandlerAdapter}
* can support it. Typical HandlerAdapters will base the decision on the handler
* type. HandlerAdapters will usually only support one handler type each.
* <p>A typical implementation:
* <p>{@code
* return (handler instanceof MyHandler);
* }
* @param handler the handler object to check
* @return whether this object can use the given handler
*/
boolean supports(Object handler);

/**
* Use the given handler to handle this request.
* The workflow that is required may vary widely.
* @param request current HTTP request
* @param response current HTTP response
* @param handler the handler to use. This object must have previously been passed
* to the {@code supports} method of this interface, which must have
* returned {@code true}.
* @return a ModelAndView object with the name of the view and the required
* model data, or {@code null} if the request has been handled directly
* @throws Exception in case of errors
*/
@Nullable
ModelAndView handle(HttpServletRequest request, HttpServletResponse response, Object handler) throws Exception;

/**
* Same contract as for HttpServlet's {@code getLastModified} method.
* Can simply return -1 if there's no support in the handler class.
* @param request current HTTP request
* @param handler the handler to use
* @return the lastModified value for the given handler
* @deprecated as of 5.3.9 along with
* {@link org.springframework.web.servlet.mvc.LastModified}.
*/
@Deprecated
long getLastModified(HttpServletRequest request, Object handler);

}
1
2
3
4
5
6
7
8
9
10
11
12
13
14
15
16
17
18
19
20
21
22
23
24
25
26
public class HttpRequestHandlerAdapter implements HandlerAdapter {

@Override
public boolean supports(Object handler) {
return (handler instanceof HttpRequestHandler);
}

@Override
@Nullable
public ModelAndView handle(HttpServletRequest request, HttpServletResponse response, Object handler)
throws Exception {

((HttpRequestHandler) handler).handleRequest(request, response);
return null;
}

@Override
@SuppressWarnings("deprecation")
public long getLastModified(HttpServletRequest request, Object handler) {
if (handler instanceof LastModified) {
return ((LastModified) handler).getLastModified(request);
}
return -1L;
}

}

4.2 org.springframework.aop.framework.adapter.AdvisorAdapter

它是 Spring AOP 框架中的一个重要组件,将不同类型的 Advisor 适配成统一的 MethodInterceptor(Advice)的工具。在 Spring AOP 中,Advisor 是将通知应用到切点上的对象,而 MethodInterceptor 是实际执行通知逻辑的对象。

Spring AOP 将不同类型的通知(Before、After、Around、Throws 等)转换为相应的 Advisor,并将其适配到切点上。在运行时,每个 Advisor 都被转换为一个 MethodInterceptor,并应用于目标方法的执行。

我们也来看下它的相关接口定义和部分实现:

1
2
3
4
5
6
7
8
9
10
11
12
13
14
15
16
17
18
19
20
21
22
23
24
25
26
27
public interface AdvisorAdapter {

/**
* Does this adapter understand this advice object? Is it valid to
* invoke the {@code getInterceptors} method with an Advisor that
* contains this advice as an argument?
* @param advice an Advice such as a BeforeAdvice
* @return whether this adapter understands the given advice object
* @see #getInterceptor(org.springframework.aop.Advisor)
* @see org.springframework.aop.BeforeAdvice
*/
boolean supportsAdvice(Advice advice);

/**
* Return an AOP Alliance MethodInterceptor exposing the behavior of
* the given advice to an interception-based AOP framework.
* <p>Don't worry about any Pointcut contained in the Advisor;
* the AOP framework will take care of checking the pointcut.
* @param advisor the Advisor. The supportsAdvice() method must have
* returned true on this object
* @return an AOP Alliance interceptor for this Advisor. There's
* no need to cache instances for efficiency, as the AOP framework
* caches advice chains.
*/
MethodInterceptor getInterceptor(Advisor advisor);

}
1
2
3
4
5
6
7
8
9
10
11
12
13
14
class MethodBeforeAdviceAdapter implements AdvisorAdapter, Serializable {

@Override
public boolean supportsAdvice(Advice advice) {
return (advice instanceof MethodBeforeAdvice);
}

@Override
public MethodInterceptor getInterceptor(Advisor advisor) {
MethodBeforeAdvice advice = (MethodBeforeAdvice) advisor.getAdvice();
return new MethodBeforeAdviceInterceptor(advice);
}

}

五、设计模式百宝箱

  • 在本节,我们开始填充我们的百宝箱:

    • 面向对象基础
      • 抽象
      • 封装
      • 多态
      • 继承
    • 面向对象原则
      • 依赖抽象,不要依赖具体类
      • 针对接口编程,不针对具体实现编程
      • 类应该对扩展开放,对修改关闭
      • 为交互对象之间的松耦合设计而努力
      • 多用组合,少用继承(尽管有类适配器的实现方式,多数情况下我们都是使用的对象适配器)
    • 面向对象设计模式
      • 简单工厂模式:定义了一个创建对象的接口,将创建对象的内容从客户端抽离出来
      • 抽象工厂模式:提供一个接口,用于创建相关或依赖对象的家族,而不需要明确指定具体类
      • 原型模式:通过复制现有对象来创建新对象,提高代码效率和可维护性
      • 建造者模式:将一个复杂对象的构建过程与其表示分离,使得同样的构建过程可以创建不同的表示
      • 适配器模式:将一个类的接口转换成客户期望的另一个接口。适配器让原来接口不兼容的类可以合作无间

六、总结

本文深入探讨了适配器模式的概念、应用场景以及在 Java 中的实现方式。首先介绍了适配器模式的基本概念,包括目标接口、适配器和被适配者等角色。然后,通过示例演示了类适配器和对象适配器两种实现方式,并以一个真实场景的例子说明了适配器模式的具体应用。

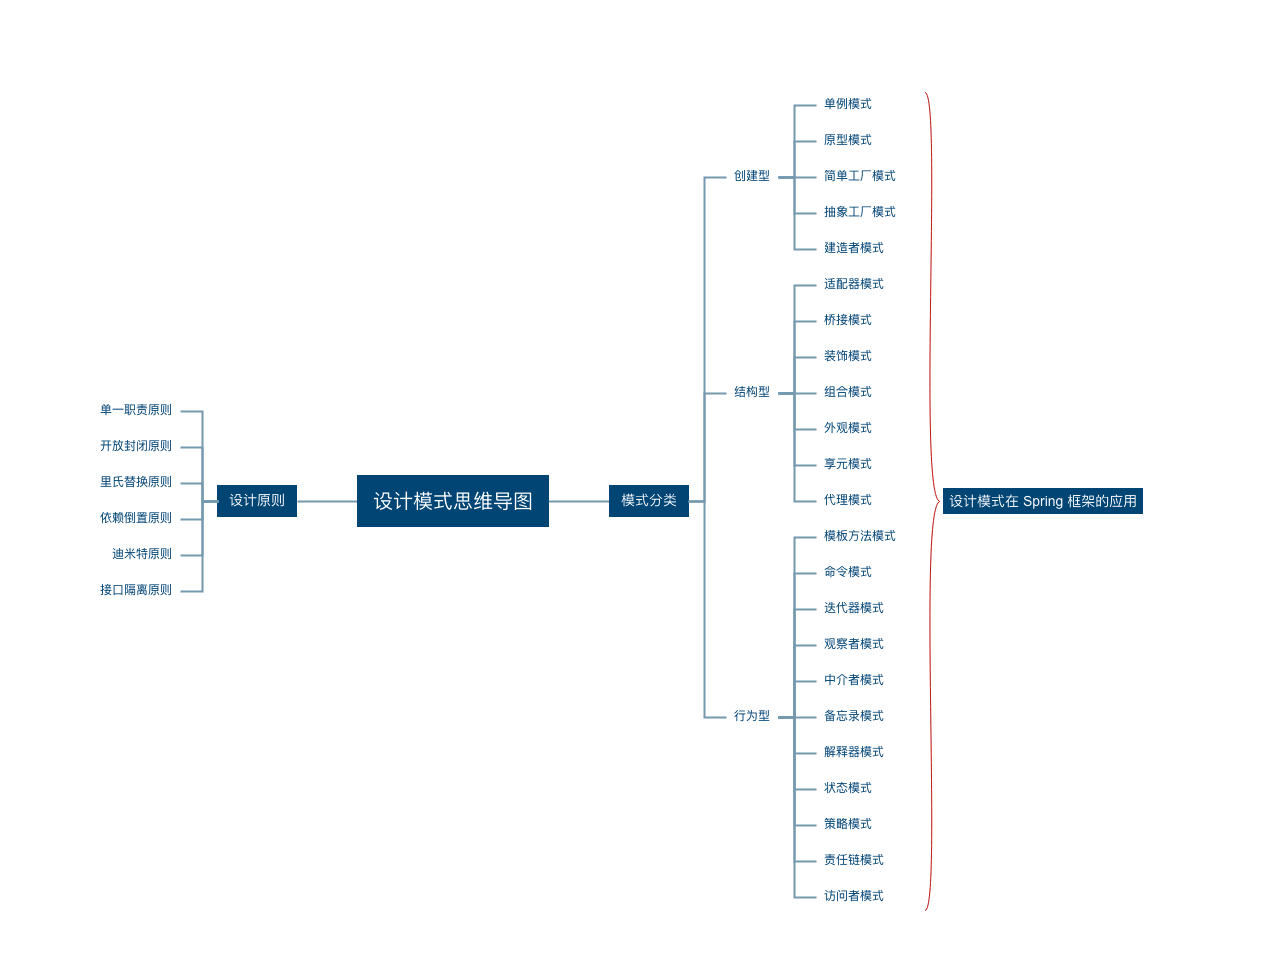
在介绍了适配器模式的基本概念和实现方式后,文章进一步探讨了适配器模式在 Spring 框架中的应用。通过分析 org.springframework.web.servlet.HandlerAdapterorg.springframework.aop.framework.adapter.AdvisorAdapter 这两个类的设计和实现,展示了适配器模式在 Spring 框架中的重要作用。

适配器模式是一种非常常用且灵活的设计模式,在实际开发中经常能够见到其身影。通过本文的介绍,读者可以更深入地理解适配器模式的作用及其在实际项目中的应用,为日后的软件设计和开发提供参考和借鉴。